Categories
Uncategorized

Loading 11mm Chassepot

Introduction

As a continuation of my series on reloading archaic cartridges I am going to discuss loading 11mm Chassepot ammo today. The Chassepot is a French breech-loading needle fire bolt action rifle from the 1860s. Although not as much of a revolution as the earlier Dreyse rifle it evolved from, it still represents an interesting bridge between muzzeloading rifles and bolt actions. It loads via the breech and fires a unique paper cartridge using a long thin “needle” to pierce the paper and hit a percussion cap igniting the main power charge. it fires a rather typical for the time 11mm bullet.

Obviously, given the age of this rifle and the unique ammo it uses, no commercial loadings are available. We must (literally) roll our own. As always you do this at your own risk. I am not an expert.

What You Need

  1. A bullet mold. I went with Accurate 46-365C, which is a reproduction of the original bullet.
  2. Black Powder FFg
  3. A 7/16 inch diameter dowel
  4. A 1/4 inch diameter dowel
  5. Basic white glue
  6. Cardboard (about 1/4 inch thick)
  7. CCI Four-Wing Musket Caps, although I suspect any caps will do.
  8. Some thick packing paper, like this.
  9. Basic white printer paper (optional based on how you want to load)
  10. Toothpicks for spreading glue

Pre-Loading Steps

  1. Get your bullets either by buying a similar bullet or casting your own. Wikipedia says the original loading used a 386 grain bullet with an 11mm diameter.
    1. I used Lee Alox Bullet Lube to lube these as there is no lube groove.
  2. Measure the length of your Chassepot chamber using the 1/4inch dowel.
    1. Close the bolt and put the dowel in until you feel it touching the exit point of the needle on the bolt. Mark the dowel at the muzzle end
    2. Open the bolt, put in the bullet you are using as far as it will go (you may need to use the dowel to push it in deep).
    3. Put your dowel back in and mark where it stops.
    4. You should now have two marks on your dowel that represent the overall length of the cartridge you are trying to make. Using the accurate bullet I got an overall length of 3.094 inches.
    5. Using a bullet you will be loading with mark on the dowel the maximum length of the cartridge, minus the length of your bullet (my bullet measured at almost exactly 1″). This represents the length of the powder charge. I got 2.059 inches.

The Loading Process

The loading process will take some time and it does require a bit of finesse. I based my process on these two posts and this video.

  1. Make a powder tube
    1. Measure and cut out a 48mm by 80mm rectangle on your packing paper. This is based on the original cartridge diagram here.
    2. Use your 7/16 inch dowel to roll the paper into a tube. You want the tube to be 80mm tall. Ultimately we want a 12mm diameter tube. The 7/16 inch dowel + the width of my paper got me 12mm, but you may have to add duct tape to your dowel to increase the diameter of the resulting tube.
    3. Right before the two sides of the paper touch, glue the inner edge and complete the roll.
  2. Create an end cap for the tube. The original design uses a paper star, but I deviated here as its very had to get the star in place correctly.
    1. Punch out some cardboard discs for the end cap. Ideally this will match the diameter of the tube (12mm), but I only had a 7/16 punch so I used that.
    2. Apply glue to the the wings of the percussion cap. You can either gently dip the cap into your glue or use a toothpick
    3. Glue the cap, wings down, onto the cardboard.
  3. Apply a thin layer of glue to the inner bottom of the powder tube.
  4. Put the tube over the end cap, gluing the end cap (with its percussion cap) to the bottom of the tube.
  5. Using your measuring dowel, mark on the tube the maximum length it can be. This will be the total overall cartridge length minus the length of the bullet you are using.
  6. Fill the tube with black powder up to your mark.
    1. The original loading was 86.4 grains. I have seen as low as 66 grains. I ended up with 75 grains FFg.
    2. Compact the powder as best you can. If you have a drop tube you can use that. I crushed the powder with a dowel. You may wish to drill a 1/2 inch diameter hole in a block of wood to hold your tube straight while you crush the powder. You do not want the tube to break.
    3. If you powder is compact, but you still have space remaining add a filler like cream of wheat or poly fill to take up the extra space.
  7. Add another cardboard disc to top off the powder tube.
  8. The original design calls for the remaining powder tube to be twisted close and the excess trimmed. I had difficulty twisting the paper I used so I cut most of the remainder off leaving just enough to glue closed the top.
  9. Cut out a bullet wrap using the plain printer paper.
    1. I took the measurements from the original diagram
  10. Put the bullet at one end up wrap (the shorter side facing up) and wrap the bullet in paper. You should get a cone of sorts. Glue the ends together
  11. Combine the bullet with paper cone and the powder tube.
    1. The original diagram has these two parts tied together with the tie happening just under the cardboard disc you topped the tube off with. I had difficulty with this part as my string was either too big or too weak. I continue to investigate other options, but for now I just glued the edges of the cone to the tube

Alternatively, you can skip steps 8 through 11 and just cram a bullet in on top, folding the the top of the tube down to hold the bullet in place. This is the most expedient method, but you must be sure the bullet does not separate from the powder charge. Space between black powder and the bullet can be dangerous.

You now should have a cartridge that is the exact overall size you measured on your dowel. I recommend building a couple test cartridges without black powder (I used corn grits instead). If you get the length wrong the needle will not hit the cap. If you get the tube size wrong then the cartridge will not insert all the way.

Final Product

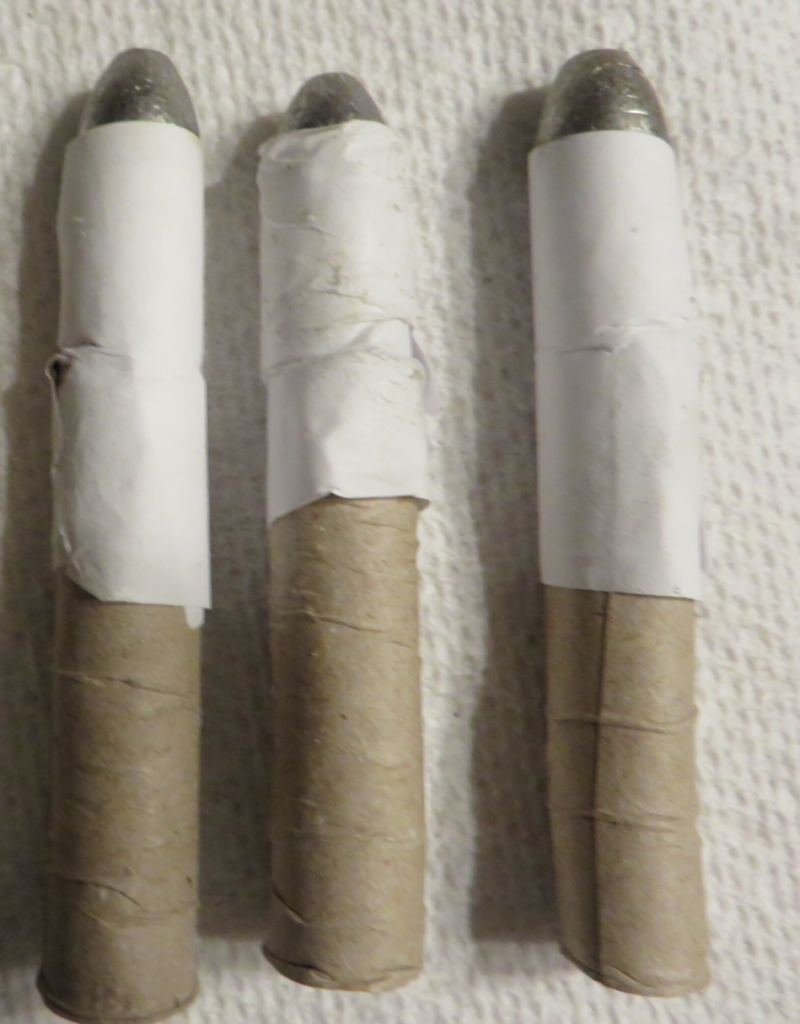
If you attempt to match the original design with the paper cone (steps 8-11) you should get something like this:

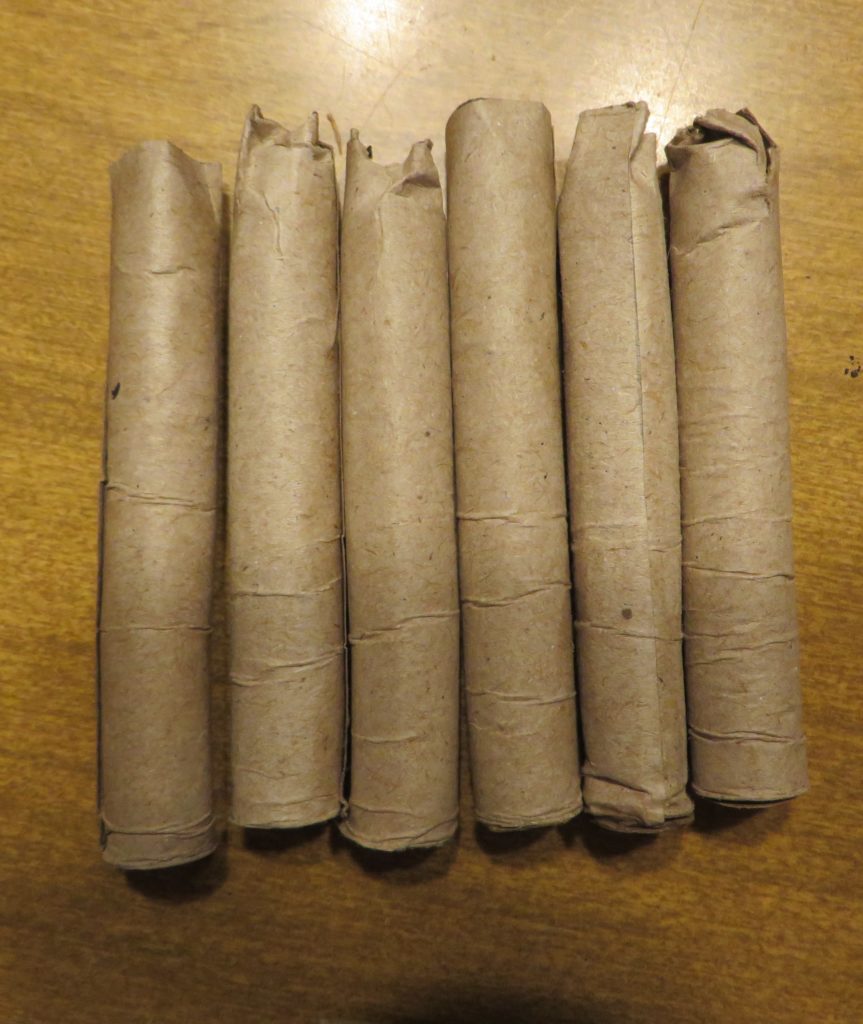
If you go with the expedient solution, you get something like this:

Shooting Results

I had mixed results. If I could get the round inserted and the bolt closed I got 100% ignition. Accuracy seems fair for a 150 year old rifle with a group of several inches at 50 yards. Occasionally not all the paper would clear the chamber and I would be left with some burnt crumbs, but usually nothing major.

That said, about 50% of my rounds fail to chamber. I usually end up with the bolt stuck with about a quarter of an inch to go. I suspect my cartridges are right on the edge of the correct size and as the chamber fouls I run out of space.

As a final note, if you are going to shoot your Chassepot I recommend replacing the bolt’s obturator and needle. If your rifle still has its obturator it has most likely hardened over the years and will be ineffective. Your needle may still work, but I would not risk having it break as I have heard they are prone to do. You can find replacement obturators and needles via Naah Tool Works.

Next Steps

I need to figure out why so many of my cartridges end up just a bit too long or too wide. To that end I need to figure out how to get more consistent paper tubes. I also want to experiment with some slightly smaller dowels and thinner paper to see if that helps.

You can follow the discussion at NorthEastShooters.

Categories
Uncategorized

Three Years at NetNumber

As tradition dictates, as a year passes I must reflect.

What Did I Learn This Year?

  1. Reloading archaic cartridges. In the previous year I had reloaded some fairly modern cartridge to prove out the process (30-40 Krag, 45-70 Government, 7.35 Carcano). This year I loaded .577/450 Martini–Henry and 7.5mm 1882 Ordnance. The 7.5 is pretty straightforward, but the Martini-Henry was a step above that and I am very happy I was able to make a number of rounds that worked flawlessly.
  2. WordPress. I am happy to move on from the old “GhandiBlog” to the sleek and modern wordpress platform. It is a little more pricey, but I have so much more control and way better tools.

What Am I Looking To Explore This Year?

  1. I am looking to continue to grow my panel catalog. For the last two years I have run a panel at ConnectiCon (and this year for the first time at Arisia) on firearm history and federal law. I am looking to create and run more panels this year. Although, given the lack of conventions this year, that may prove to be difficult.
  2. A new computer/VR. My old rig has been limping along for a few years now and I think it is time to take the plunge and upgrade it. I also would like to take the opportunity to get into VR, if only to play Half Life: Alyx.
  3. Books. I have a healthy audiobook/podcast habit, but I am looking to start working down some of the physical books collecting dust on my bookshelves.
  4. Oddball AMV ideas. I certainly cannot win any awards doing something conventional so I have to go for the weird angle.

What did I Fail at This Year?

  1. The downstairs bathroom is still unfinished. I did tear out the carpet though.

Conclusion

Not a whole late has changed from last year. I am not sure if that is concerning or not. Part of me thinks that is fine as I am certainly enjoying the day to day, but the other part of me thinks that is concerning as I should be trying new things.

Categories
Uncategorized

AMV: Mobile Suit Jox

This was one of my submissions to Anime Boston 2020. It was not a finalist. Watch it here.

Robot Jox is a 1990s movie about robot “Jox” who pilot giant mechs to resolve territorial disputes. It makes a natural pairing with Mobile Suit Gundam as the conflict between Amuro and Char nicely parallels the conflict of the main characters in Robot Jox. This was an interesting project for me as it was the first time I did a trailer AMV. 90% of this project was straightforward as I just had to match up the trailer footage with scenes from Gundam. That said, there were some tough bits. In particular I had difficulty matching up the lip flaps for a few scenes where characters talk in the trailer.

Overall, I am pretty happy with how it turned out.

Director’s Commentary:

00:00 : I really like how the trailer intro turned out as I got to fill it with a bunch of Gundam specific jokes. I went with a red R style instead of the classic green just to be different. The actual movie is rated PG.

00:19 – 00:21 : A rather famous scene from Mobile Suit Gundam which is a bit of an injoke for fans.

00:29 – 00:30 : I spent a lot of time trying to get this to sync with the trailer audio. I think it is the weakest part of the AMV, but it does work.

00:48 : This particular scene shows up many times in Gundam so I was lucky to find a good spot in the trailer where the audio syncs up so I could use it.

1:04 – 1:05 : In the trailer, the noise is from a giant chainsaw. It was hard to find something that works given Gundam’s futuristic setting. I think this is fine, but I would have liked something better.

1:05 : Shout out to Mr. Skehill, long time fan of the show, for correctly identifying the episode this laugh occurs in so I could use it here.

1:13 – 1:15 : This scene actually ends about half a second too earlier for me. I could have stretched it out, but it would have messed up the audio sync. Luckily I was able to copy that half second from the beginning of the clip and it all worked out.

1:16 – 1:17 : I never liked this scene transition, it always seemed too abrupt.

Categories
Engineering Projects

Loading 7.5mm 1882 Ordnance: My Process

Author’s note: I posted this on a
local reloading forum
. I am reproducing it here in the hopes that someone trying to do what I did can learn from my experience.

I recently bought a Model 1887 Swedish Nagant and I of course wanted to shoot it. This revolver shoots 7.5mm 1882 Ordnance. It
was used by the Swiss and Swedish, so you will see the country names used interchangeably when searching for information online. You can buy smokeless powder rounds from a few specialty places, but I wanted to shoot a round as close to the original as I could,
which means its time for the holy black. I also get weirded out shooting smokeless powder in guns designed for black powder. To that end, here is how I went about loading 7.5. As always, you take your life into your own hands following my instructions. I could not find any load data in my books so my process is an amalgamation of everything I found online.

First I bought a bunch of 32-20 brass. This is going to be our parent case. I have a Lyman universal trimmer with an adapter for a power drill which I used to trim the cases down. Go slow and trim each case to a length of 0.89 inches. You especially need to be careful as you trim past the shoulder on the case. If I went too fast the cutter would push the last end of the shoulder into the case and mess up the case. After all the cutting was done I used a case prep tool to clean up the mouths.

Once you have the cases prepped, you are going to need some bullets. I went with 310 Cadet bullets from  Matt’s Bullets. These are heeled bullets like the original cartridge uses. Ideally I would have bought the mold, but the molds were going for $70 or so and you can get 500 bullets for a little less than that (lubed too). Diameter wise it is between the original Swiss (.315) and Swedish (.327) bullet diameter.

Now you are ready to reload. For my load I used CCI small pistol primers and 11 gains of 2F black powder (GOEX) topped off with a .32″ diameter, .025″ thick card from Track of the Wolf. Ideally I would have liked to put a lube disc on top of the charge and before the card, but there was not enough space left in the case. I did not use a drop tube, but you could probably ring some more space out that way if
you had one.

Now, you could spring for the correct 7.5 dies, but they were pretty
expensive and hard to find, so I jury rigged a solution using some cheaper dies. I seated the bullet using a 32 short (32 S&W) seating die. Do not press too hard or you can crush the case given this is a heeled bullet. Once the bullet is seated I put a riser on the press like the ones you find in a bullet resizing kit. Then I screwed a 30-30 WIN crimp die all the way down. If you put a bullet on the riser you can get it high enough into the crimp die to crimp the bullet in place. You need a crimp or otherwise I found you could easily pull the bullet out with your hands. Running the crimp die all the way down probably gives you more crimp then you need, so your may want to experiment with a little less crimp than I used.

Shooting wise, it seemed a little anemic, but it went bang. I am not a great shot with revolvers, but it was hitting the target at 10 yards so I was happy.

Categories
Anime Projects

Stories for a Dark Night AMV

For your pleasure here.

My sixth AMV, submitted to Anime Boston 2019, ConnetiCon 2019, and PopCult
Anime Con 2019, but never accepted to the finals. A far more experimental piece
than the other ones I have done. I really liked the idea of poems set to anime
and music and it is cool to have a bit of a compilation of them in one video.
It is kind of like a very quick anthology film. It was an interesting project
to work on as I only had the poems to start with and thus a lot of time was
spent finding the correct anime and music to go along with them. Originally, I
thought to frame the narrative as if it was one long night, but I ended up
carrying on into the morning as I did not have enough “night campfire” footage
to work with. Overall, I am very happy with the final work, but, as it the
norm, I wish more people liked it.

Director’s Notes: 00:00: I like starting AMVs out with no music. I think
this technique is underutilized. As an overall note, all the sound effects are
from outside anime. Mostly stuff I found on Youtube.

00:19: If you have an eagle eye you can see Rin’s smile stay in place, but
her head turn. She is talking in this scene which wrecked the vibe. I froze the
smile, but I did not bother with trying to move it with the face given how hard
that would be, compared to how minor the error is.

00:23: I tried putting the poem’s title here first, before the actual poem,
but I found I liked them better at the end.

00:26: I watched The Rose of Versailles in preparation for this
AMV when I found I needed something set in an aristocratic period. Pretty good
anime and very forward thinking in some ways.

1:03: Not a huge fan of this clip, but in every AMV you always have a few
seconds where you struggle to find something that works. This clip was ok so I
went with it.

1:31: I never found music for this poem that I was thrilled about. I tried
several songs. What I ended up with was ok, but nothing special.

02:14: The hard cut at the end of this poem arose out of the need to stop
the music and get back to camp site. I tried a couple ways to fade it out, but
they all sounded very abrupt so I went with a thematic hard cut showing Lain
here. It is a neat nod to the show and probably very confusing to those who
have not seen it.

02:33: My favorite of the four poems and the easiest one to do. I love the
poem and I love the anime (Legend of the Galactic Heroes) so it only took me a
few hours to cut this together and it was basically done after that.

03:28-03:32: I love how the white fade out transitions to the sky back at
the campsite.

03:47: There is something very pleasing about that woodpecker in the
distance right around here.

04:38: I like how 8man looks at the audience at the end and how Rin a few
seconds later waves at us.

Categories
Anime Projects

Martian Successor Nadesico AMV

For your enjoyment here.

My seventh AMV, submitted to Connecticon 2019 and PopCult Anime Con 2019,
but it made the finals at neither. A bit disappointing it never got traction as
I had hoped to shine some light on an anime that seems sadly forgotten despite
it not being that old. For reference the last AMV I could find using this on
Youtube was from 5/2017. It is even worse on animemusicvideos.org (9/2013).
That said I did operate under the delusion that it was “Martin” Successor
Nadesico for quite some time so, perhaps I needed the refresher. Not my
greatest work, but I am pretty happy with the end product.

Director’s notes: 00:13: I am pretty fond of Yurika’s introduction. I think
it establishes her character fairly succinctly.

00:14-00:16: Some unavoidable talking here, but it is hard to see on a first
viewing.

00:34: This clip is a little awkward. I wanted to show Akito as a mech pilot
and tie it back to him meeting Yurika (you will notice he has the same shirt
on), but Akito is doing a fair bit of talking here so I had to freeze his face,
but keep the background movement. It works, but he has an odd sort of facial
impression because of it.

00:47-00:52: I like the music and visuals here. Good lull in the music with
a sharp upswing that I think is well complimented by the clips I selected.

01:09: There is more talking in the background here, but I wanted this clip
and it is hard to notice.

01:16: I really like the timing of the horns and the lasers hitting the
Nadesico here.

02:17: A similar thing is at play here with the drum and the shoulder
turn.

02:41-03:04: This is probably the weakest part of the AMV. I needed to play
up the relationship of Akito and Megumi in regards to Yurika, but I had a hard
time doing that.

03:13: I love this clip of Yurika struggling in zero-g. This episode had a
lot of scenes like this.

03:22: This is an AMV primarily about Yurika, but I really wanted as much
Yuri as I could get too.

04:11 Not sure about the ending card here. This is the last scene from the
show. It might be a bit much, but I kept it.

Categories
Musings Review

Two Years At NetNumber

As tradition dictates,
once another year passes I must write up my thoughts.

What Did I Learn This Year?

1. My gun affair is not abating. If anything my collecting has increased in
scope, complexity, and intensity. This has been unhelpful in terms of my long
stated and long running goal of retiring early. That said there
have been some nice unexpected benefits. I enjoy the atmosphere at the local
club and this hobby is a good excuse to get outside on occasion. I am hoping to
cool things down a bit this year as my collection rounds out, but I remain
vigilant for new pieces. Right now this happens to be French rifles.
I cannot imagine why
.

2. Metallic cartridge reloading. Riffing off the above, I was able to reload
small batches of cartridges this year (~200 or so total) in a few differing
calibers. I considered taking a class on this, but instead I got a book and
watched a lot of videos on the subject. This was sufficient to get me going,
but I am still considering a class so I can clarify some of the finer points.
This will be a skill I need to curate as my collecting habits lead me to pieces
with no commercially available ammo. As a collector who shoots everything he
has I will need to be able to “roll my own” as they say.

3. Adobe Premiere and Adobe After Effects. I used both of these applications
extensively for my April 15th project.
After Effects was definitely required, given all the rotoscoping I had to do,
but I probably could have gotten away with using my old standby, Sony Vegas. I
just wanted to branch out and try some other editing suites to see what they
offered. What I found was I still prefer Sony Vegas, but it was a fun diversion
to see how other applications handle similar tasks. I do like how Premiere
manages effects on video clips though. Luckily, I tend not require a lot of
that so it is no huge loss.

4. I am not a huge racing fan. After dabbling with a Lemons racing team for over a
year I decided that the racing life was not for me and retired. We did have
some success, taking home an Organizer’s Choice award at our
first race
, but I decided that it was just too much of a time and money
sink and I did not have the passion to needed continue. I do however still
follow the team’s progress and some parts of the car mysteriously keep finding
their way to me.

5. Corn tortillas are weak. Flour is the ultimate tortilla. I tried corn
again this year, just in case my taste buds have changed, but I can report they
remain loyal to the one true tortilla.

What Am I Looking To Explore This Year?

1. Civil war reenacting. I mentioned this last year, but I feel more serious
about it this year. That has not translated into any tangible actions yet, but
with the money from the racing team freed up I think the stars are starting to
align. This also lines up nicely with me wanting to go to more reenactments in
general. There are a couple groups in MA I will investigate.

2. Convention Panel Running. Last year I ran a panel at Connecticon on
firearm history and federal law. I think it went well (people showed up) and I
am planning on running it again this
year
. I am hoping to spread out and bring it to other conventions, but I
accept it can be a hard sell.

3. A new convention somewhere out west (we must go west young beans!). I
think right now we have a good distribution and mix of conventions we go to,
but I would like to rotate in a new one to try. Maybe Gen Con or Anime North in
2020.

4. Podcasting. I had so much fun doing this video about my April 15th project that
I would like to do it again. I am not sure about what though or with whom. More
research will be required.

What did I Fail at This Year?

1. Saving money. It is the same refrain as last year. I did increase my
savings rate, but I will need to do better if I want to retire early. So long
as I keep my hobbies though, this is looking doubtful.

2. Cooking. I have felt in a bit of a recipe rut as of late. The problem is
I am too comfortable with my normal standbys so it is hard to branch out.
Oftentimes I will find some new interesting recipe, but I will be intimidated
by the steps or the new ingredients. I think I need to find simpler
recipes.

3. Lawn care. That said, is it really failing if you do not care about the
outcome? I do occasionally wish the grass looked a little nicer.

4. Home improvement. Last year I said I would work on the downstairs
bathroom. The downstairs bathroom has not been worked on. The mission
continues…

Categories
Anime Convention Projects

April 15th, A Most Interesting Day

This blog post is talking about my latest work. If you have not
seen it, go do so now or else the following will make little sense.

Another AB, another video submission. Ultimately this entry, along with the
other one I submitted (which I will speak of later), was not accepted into the
finals (sort of). This is the fourth time I have submitted to the contest.
Overall, I stand at two accepted to the finals out of six submissions.
Technically, this was shown at the finals, it was just under “Exhibition” and
not eligible for any awards so I will not count it. Usually, I do a bit of a
textual commentary on specific scenes in the final product, but I experimented
with doing that via the medium of video. This was a
fun diversion as I was joined by longtime friend of the show (and a man
familiar with the visual arts) Patrick
Skehill. We were able to cover a lot of ground and go into more detail than a
normal blog post would cover. I will however reiterate some of that content in
this post.

From a high level perspective I am satisfied with the end product. I had
this idea (along with my other submission) last year and I mentioned it in my
yearly review. At the time
I said the following:

“I have some ideas which are a bit out there as far as my next AMVs go. I am
not sure how that will help me win any more awards, but they should be
different from the usual fare if nothing else.”

That prediction turned out to be pretty spot on. From a production
standpoint, this was my most ambitious and labor intensive project yet. I took
the initial nebulous idea and made a
write-up
of all the live action shots I wanted on 7/27. Using this list we
did the live action filming on 8/25. We stuck mostly to the shot list, but we
had a couple diversions (mainly the meeting room scene). Thanks again to
Mr. Skehill for providing the filming equipment, working the camera, and his
acting skills. Following that
I spent the next month (September) getting the live action cut plus the music
in order and ready for me to put the anime in.

For editing, I switched to using Adobe Premiere from Sony Vegas (which I
have done all my other projects on), partly to experiment with other editing
tools and partly to be in the Adobe family for better integration with Adobe
After Effects. Ultimately, I like Vegas more, but Premiere has a number of
features that helped for this specific project. Editing was pretty
straightforward except every live action shot had to be color corrected. We
filmed “flat” so we could have flexibility to set the time of day by altering
the coloring. There are other reasons, but I forgot what they were as this is
not an area I know much about. That said, it was particularly useful for the
scenes that are supposed to be at
night
(which were all filmed during the day). Additionally, I ended up with
a lot of extra live action footage. It was a good problem to have as it gave me
flexibility in the edit, but It is a shame some cool stuff got dropped.

The anime cutting process started 8/14 (I know this because we put the first
anime clip, the Gundam in the
background
, in that night before watching the Patriots beat the Chiefs) and
ran right up until I submitted the final project on 2/21. Progress was slow and
remained slow for the entire five months. It turns out cutting clips of anime
out of a myriad of different sources is very time consuming, let alone the
endless time spent trying to find good clips (plus the time lost actually
watching anime when I was supposed to be looking for something to cut out). I
would estimate I spent about 10-15 hours a week on this, with only occasional
bouts of self doubt delaying me.

Using a good quality source with a clear distinction between the background
and the thing I was trying to cut out I could get a good clip (say 1/4 to 1/2 a
second of runtime) in under half an hour. If the clip needs to be longer, or
the quality of the source is poor, or the thing being cut is indistinct from
the background then it would take more time. The most time intensive clips
would be Priss in the garage from
Bubblegum Crisis
and Heintz
walking around the stand in Magnetic Rose
. Both took about six to eight
hours. Given there are 100+ unique anime cutouts, you can do the math. I used
the After Effects rotoscoping tool to accomplish this. This tool is helpful,
but it can have a bit of a mind of its own. In many ways I still do not quite
get this tool or its settings, but I can use it.

Ultimately this was not selected as a finalist. I did try to stay within the
rules, but I think what most likely fouled me up was this rule:

” 75% of the footage in an entry must be from anime or Japanese-origin video
games “

I do contend (and I have the
data
to prove it) that I have more total anime footage than live action,
but I do respect that this sort of entry was just too far outside the bounds of
the contest. I do however very much appreciate that it was shown as an
Exhibition piece. It is a consolation prize to be sure, but I suppose I should
care more about people seeing what I do then just the accumulation (or chance
thereof) of prizes.

Generally, I am happy with how this turned out and I am pleased a lot of
people saw it and liked it. It was strange to be recognized at the convention,
despite my best efforts, but fun. I do think my next project will be more
traditional though, if only to save my sanity.

Categories
Anime Projects

Girls’ Last Tour AMV (Fifth Overall)

You can watch it here.

This was my second entry to Connecticon 2018, but it was not accepted. A bit
of a different take compared to what I normally pursue, this one focused almost
exclusively on a single episode of Girls’ Last Tour, a fairly recent anime. The
episode I used (episode 6) was my favorite of the series and is a great
standalone episode even if you have not seen the series before. For the song I
used “Fly Away” by John Denver. I am not a country music fan, but I felt this
song matches a lot of the themes I was going for both literally (flying away
from some place) and metaphorically (escaping).

Scene Breakdown

00:00 – 00:41: I really like the non-musical opening. It sets the stage of
the world well (which may not be familiar to some of the audience) and quickly
conveys the journey the girls are on. In general I think silence/non-musical
scenes are underutilized in AMVs.

00:47: A bit too quick of a cut here, but there was no other way to get
around it since the characters start talking right after and I like to avoid
seeing that if I can.

01:08: Good sync up with the lyrics and plane image here.

01:12 – 01:13: It is hard to notice, but there is some lip movement here. I
tried to avoid it, but it would mess with the story progression too much if I
cut it. It is hard to notice so I felt it was ok to keep in.

02:10: More lips flaps here, but the scene was too critical so I kept
it.

02:19 – 02:29: I am not sure I was able to convey that the pilot wanted to
escape in these few scenes, but it was the best I could do with the limited
options available. On the last scene (02:29) I actually froze the clip as they
are talking during it.

03:04: I think the animation in the show is average, but I do like the faces
they make from time to time.

03:34: I like the sync between the picture and the song a lot here.

03:58: Continuity error here with the propeller starting in the scene
before, but being stationary here. I felt it was ok to leave in as most people
would not notice and its not really a big deal.

Summary

Overall, I am happy it turned out as well as it did and I very much like how
this piece is different in structure than what I normally do. That said, I am
pretty bummed it was not accepted as I felt it was a strong overall piece, but
I cannot say it was better than the actual finalists so I will just have to do
better next year.

Categories
Anime Projects

Bubblegum Crisis AMV (Fourth Overall)

You can watch it here.

This piece was my second entry to Anime Boston 2018 and my first entry
Connecticon 2018. It was accepted at neither convention. This AMV is pretty
normal given my past work and is indicative of my general style: poppy music,
oldish anime, ironic lyrics, boarderline extreme violence. I happen to really
like Bubblegum Crisis (the original OVAs, less so for anything after) and MC
Frontalot (who is featured in this song, Robot Party by Supercommuter) so it
was a natural fit to merge both.

Scene Breakdown

00:00 – 00:14: I like this intro a lot. Not a lot of musical cues and it
sets the scene well. Perhaps I could have used some background noise, but I
think the silence is cool and unusual.

00:37: There is a weird white flash here that probably works better in the
anime than it does in this AMV. I thought about removing it, but it seemed best
to leave it in so that scene would not become disjointed and look weird.

00:45 – 00:50: This is one of the first bits I put together and it inspired
the rest of the AMV.

00:55: I consider this AMV to be mostly about robots tearing up a city, but
it can also be seen as a stealth Knight Sabers AMV as they appear in the
background from time to time. Some of the Knight Sabers appear in this scene
for the first time in the AMV.

01:00: I thought the biker sliding during a spin out was a clever match to
the “rotating” lyric.

01:37 – 01:44: Probably the weakest part of the AMV. I wanted to match the
lyrics, but there is nothing available that quite did it so I was left with
this.

01:48 – 01:50: I had to slow this clip down a bit so it would fill out the
lyric, but it looks a bit weird because of it.

01:56: Another Knight Saber appearance.

02:18: I really like how “dance” and the guy flying line up here.

02:23: This is a Knight Saber “sword” here. Nothing else really matched.

02:45 – 02:52 : Pretty obvious Knight Saber scene here which fans of the
show should recognize.

03:45: I considered ending with a tv screen turning off, but it it never
worked well enough to use.

Summary

I spent a lot of time gestating this one and I like it a lot. I am surprised
no one else seems to like it, but that seems to be more an indictment of my
taste than others’. Overall I am happy how it turned out.