I mentioned I would talk about this as it is a work in progress. Objectives
for this post:
- Explain what I hope to accomplish.
- Briefly cover the work up to now.
- Discuss future work and improvements.
The End Result
Lets look at what an ideal final product would look like:
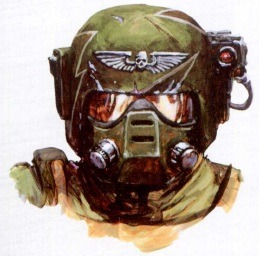

Pretty cool, but there are a couple tough elements to replicate.
- The sides of the helmet reach down much further than a modern day military
helmet. - The Imperial Guard logo on the front is pretty detailed and I have always
been rubbish with intricate work like this. - There are three rectangular side bits.
These reasons make it tough to just buy and modify an existing helmet so
that was out. This is why I started from scratch with a paper model.
Materials and Construction
The general idea is to take a 3d model from a game (in this case Space
Marine – RELIC) and ‘unfold it’ so that the 3d model is reduced to its
constituent 2d elements. Lucky for me someone did this already with the helmet
I want to make. You can find the file here. You will
need some free software like Pepakura
Viewer to view the file. The end result of all this is you print out a
bunch of sheets that in total look like this:

I used cardstock (heavy paper) to print out all the shapes. Then you have to
put this together based on the fold lines and the 3d model you can see in
Pepakura. I used hot glue to piece everything together. It is generally easy
until you come to a piece like this:

You ever seen I Borg from TNG?
Where the crew is thinking of sending an indiscernible shape back to the Borg
collective to destroy them. Borg would be toast trying to process this thing.
After about a weekend of time you get something that looks like this:

Gallery here.
Its a neat look and it is probably the hardest part of the project. Next I
covered the whole thing with fiberglass resin (inside and out) and then covered
the inside with fiberglass mat. The mat is coated with resin and bonds with the
inside of the helmet to form a hard shell. Couple of quick pointers on this
process:
- Work with small batches or you will end up having the resin turn solid
before you can use (re: the 20 bones worth of resin wasted on the Kasrkin
project). - For goodness sake MAKE SURE THE HELMET FITS BEFORE USING THE RESIN
OR MAT. I did not do this and that is why I had to hack out the bottom
portion of the helmet so I could actually wear it.
After you do all the resin go over the helmet finding streaks of dried
resin. Sand these out so everything is smooth. You will end up with something
like this:

Gallery here.
Then apply a layer of bondo. This should hopefully give the helmet a nice
smooth look and provide additional strength to the outside shell. This is what
I ended up with:

Gallery here.
Yes it looks ugly, you sand all that off. Get a power sander. Your time is
too valuable hand sanding. This is the stage I am at now and here is what it is
looking like:

Gallery here.
Next Steps
Couple problems I encountered:
- Not sure I went to light overall on the bondo or just to heavy in places,
but while sanding it is uneven in places. - The logo on the front is not quite right. Right side is not mirroring the
left, needs more sanding. - There are a bunch of places where the there are little bondo craters.
- The bits that jut out the front are not quite finished.
Unsure how I want to proceed. I would like to fix the front tabs and smooth
out things a bit more. I could do another layer of bondo, but I am concerned
about the helmet weight and I would like to avoid adding more if possible. I
could try and fill in all the craters with regular white glue, but not sure how
well that will stand up to general wear. I could do another layer of resin, but
again concerned about the weight. Might be light enough to justify though.
After the helmet is sufficiently smooth I will paint it and add some eva
foam padding on the inside so I can actually be a bit comfortable wearing
it.
Will update as project continues.